Wednesday 28 August 2013

Post 118 Slab roller

It's the big pots that did it. The straws that broke my back. Well not exactly but getting a large piece of clay to a uniform thickness and flat using a hand roller and a couple of sticks is not easy. Making smaller pieces and then joining them will not produce a marketable product of the right standard. Pieces of clay which have been rolled in different directions and not joined in the same alignment may choose to go their separate ways later during firing. At the very least the joins are hard to hide.
I even made a new hand roller out of large diameter PVC pipe filled with concrete. It was good but heavy.

My conscience and chair of our ethics committee (my dear wife) has just reminded me as I write this, about hand building with a capital H and the possibility of the compromise I was making to my artisan's principles. Ha, well from now on they kick in after the clay has been rolled.

I say from now on because Father's day has just come early with the arrival of my new slab roller from the good old USof A. Two weeks in the mail from order; thank you internet and USPS.


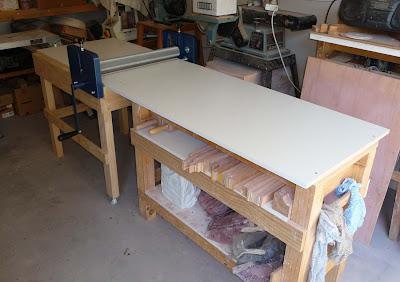
 The roller from North Star has an operating width of 24 inches, is gear driven and has two counter-rotating knurled aluminium rollers. It has individual depth adjustment on each side. This is how I bought it - bare of a table, so I could do a custom setup, which I have now done.


The idea was to make a movable feed in table that I could position adjacent to my work bench as I needed it. This picture shows that part and the wheels just under one end so it moves like a wheel barrow.


And here we are with it butted up to the workbench. You can see my rollers and depth sticks on the shelf under the bench - can't see that I'll be using them much anymore, what a shame! I wonder what I'll do tomorrow?


Monday 26 August 2013

Post 117 Biggest pot to date

Some time ago I posted a picture of this pot when it was being made and upside down. Well it has finally worked its way through the pipeline to completion. I should fess up to the fact that this is actually the second one I made; the first just was not up to scratch.

The final size of the pot came in at 600mm x 420mm x 55mm which was right on the required spec. This is the largest pot I've made to date and there will not be a bigger one. The design process started with a paper template to place in the kiln, on the diagonal, to find out just how big I could go. That worked out at about 670mm, which meant that I made it so that when it was wet it was too big for the kiln and I was relying on the shrinkage from wet to dry to get it in the kiln for bisque firing; very tight. I couldn't get the same length with a rectangular one.

The clay is Clayworks LGH and fired a nice cream offwhite. The clay works well and behaved well throughout the process.


The glaze colour was also a special request and I actually ran a test of about 15 offwhites to get the right tone - not too yellow , not too pink, but just right!  The only colourants are titanium and tin, both of which can be quite influential on colour when you are looking for subtle shades.

A lot of trouble for one pot, I hear you say and yes that's right but each new challenge represents a learning opportunity that should make the next time easier and the investment in time hopefully gets spread over many not just the one. For the time I've invested it certainly is great value for money, but I now know just a little more about this craft than I did before, too.

I hope the next time you see this pot it will be under a forest planting of Tridents at the NBPC in Canberra.

My latest challenge is clay. Since the relaunch of Clayworks RGH, reformulated with a new RIO colourant my early experience is mostly unhappy which is why there haven'tbeen too many  'new pots' posts lately. The clay characteristics and my working patterns seem to be less compatible than they were and I am faced with moving to a different stoneware choice that may be berrter suited to the sort of handbuilding I do. I have trialled a couple previously and have at least two to test more widely. What do they say about the only stable thing being change!

Thursday 22 August 2013

Post 116 More on the Aphananthe

I continued to be bemused by the different shape of the leaves I collected when looking for the Native Elm of the last post.


The leaves on the right are clearly a different shape and possibly too different to be the same species as the 4 confirmed Apananthe philippinensis leaves on the left. The philippinensis leaves are heavier, rougher in texture and the serrations have a real little spike on them like a holly. The leaves on the right are lanceolate (come to a point), softer and the serrations do not have the same sharp spikes.

So some more searching and I found that there are three species of Aphananthe; philippinensis, aspera and cuspidata. A. aspera comes from China, Japan, Korea and Viet-nam and shares many of the macro features of philippinensis.

Here is an identifying picture of its leaves:


And then a picture of the trunk of one growing in Japan: Pretty impressive example.


 And here is another younger one from Kyoto.


This one could be a great bonsai candidate, good leaf reduction, elm like growth habit, fluted trunk etc etc.

The interesting thing is that the good Save Our Waterways folks who have done fantastic regeneration work over a long period along Enoggera Creek removing week species and rebuilding native populations, may have inadvertantly introduced a foreigner. 
I have of course done the right thing, let them know and offered to take them if they decide to dig them out!!!
If they leave them there, in close proximity to the philippinensis, it might lead to some interesting vigorous hybrids in the years ahead.


Wednesday 21 August 2013

Post 115 Native Elm

With a trend to greater adoption of Australian native species for bonsai the Native Elm is one I have not seen used. In fact I have only just recently become aware that we have a native species which is a true member of the Ulmaceae family, pretty exciting actually.

Our Native Elm (Aphananthe philippinensis) also known by a variety of other common names including Wild holly, Rough leaved hickory, Greyhandle wood, Axe handle wood occurs along the Northern NSW and Queensland coast all the way through to the Philippines, which is where it was first described, hence the name. That last common name; Axe handle tree, came about because the early settlers appreciated the timber for axe handles and then proceeded to use them to cut everything else down.


It can grow to 35m but more commonly to 20m, so a nice sized tree, with a narrow canopy and a trunk that can become buttressed and fluted. The leaves are simple ( ie not multi lobed), alternate (meaning the nodes are alternate and thus good for branching), prickly or toothed and of quite heavy texture with a sandpapery surface feel.


This map shows the Australian distribution. Its preferred habitat is dry rainforest, if that's not a contradiction, but looking at the map it sure likes coastal proximity and the Qld/NSW border is the hot spot. It is a very hardy and slow grower, should be perfect for bonsai.


Here is a picture of the leaves and you can clearly see why it is also called Native Holly. Apparently the toothiness of the leaves changes as the tree matures. Whether it is possible to get leaf size reduction is an interesting question that will only be answered by having a go. The fruit is apparently edible and tastes of stewed apples.

With that in mind I had to do a little research on where to find some locally but was successful and now have a bundle of cuttings set for the spring. The next shot is a picture of the different leaf shapes on the bits I collected, which show an amazing variety. I'm not even sure if the one on the right is an elm but it has all the other characteristics and habit. The leaf on the top left is 60mm long.
 

Apart from the one unknown of leaf size reduction everything else about the species say it is a great candidate for bonsai.


Wednesday 7 August 2013

Post 114 Another firing

In the last post I showed Pot 72, which is the first of a shape which I think of as a compound oval. The front and back walls follow the line of an oval shape, as do the two ends, and where they come together they are joined by a long radius curve. So they are a long way from rectangular, more oval with cropped ends. In my latest firing I finished two more.


The first one, Pot 75,  is pretty big at 500 x 375 x 92. In the second picture you can better see the shape. I've glazed it in a very nice green glaze that I have used before and will again. The pot is intended for an Australian native evergreen or ficus.
I'm very happy with this shape and certainly with the glaze finish on this pot.

The clay body is the new Clayworks RGH which has more iron oxide than the old RGH and as such finishes up with a darker slightly red tone compared to the old buff colour. I think I prefer the old colour.


The next one, Pot 73, is of the same shape but a little smaller and deeper at 460 x 338 x 100.


On this one I've glazed the feet as well, using one of my 'unglazed simulator' browns and am very happy with the way is has finished up with a few patina colours washing over the surface too. This was a first time for this glaze on a finished pot but also will not be the last. The size is also very useful and I'll be making more these.


This little oval, Pot 82, is in a nickel zinc cream glaze which you will have seen before. The colour will go well with a wide range of deciduous and evergreen trees. This pot is about 295 x 212 x 60.


And finally a shohin, S29, in the same glaze as the big compound oval.

Saturday 3 August 2013

Post 113 A few new pots

Just a few new pots from my last firing.


First up just a couple of quickly made kiln-filler shohins, one in blue and the other a light brown, both new colours not used before. The layering of the blue worked well.


This one, Pot 72 is a 305 x 225 x 70 compound oval, or bowed wall rectangle. The glaze is another new one; a brown with redish flecks. Making strictly straight sided rectangular pots and keeping the sides straight through the process is very challenging and only takes a small movement to destroy the whole effect, not to mention the effort taken to make them. The elliptical bows of the sides of this design however, soften the harshness of the strict rectangle but at the same time practically, offer a little more internal capacity than an oval pot of the same dimensions. Having made a few to this shape now, I've almost made the separation from the straight sided rectangle and can't see myself going back. The feet of the compound oval can be flush with the wall or offset to soften the profile; a very adaptable and practical design. I have a couple of larger ones just bisqued and now ready for glazing, soon.


This last one, Pot 79, was a bit tongue in cheek, a bit of a rash experiment. It's a rustic, sloping topped, circular, conical sectioned, semi cascade pot about 280mm diameter at the top and about 180mm high. Definitely another love it or hate it pot.